|
|
|
Skinned Hinges - Minnesota Style I have been playing around with skinned hinges for about 2 years. Mike Del Ponte was one of the first (that I read) that put a pretty detailed description of his method out on the web. His post inspired me to give it a try. My first couple attempts were crude at best. Most often they were quite stiff, and I always worried about them failing, or having a servo fail trying to move them. Although they were awfully stiff, they still seemed to work quite well. Ever since those first few attempts, I've tried to improve the method with every new racer. My latest breakthrough came to me from another local racer who started using
Fiberglass sheet as his hinge material. Fiberglass sheet is available from aerospace
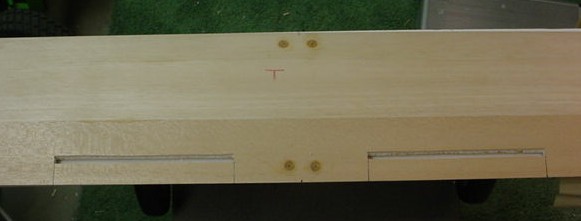
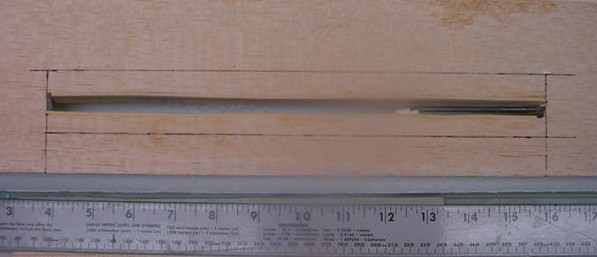
composites. For aileron hinges I'm using .010 thickness which seems to work very well. My next installment to this thread will detail skinned hinges to the V-tail elevators where I will use .005 thickness. The first step I take is to mark out my ailerons (top and bottom) on the wing. I use
11" length ailerons (personal preference), starting 4" from the centerline of the
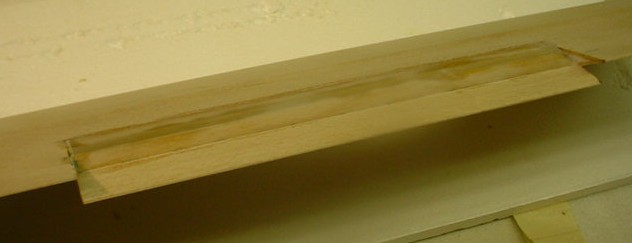
wing. I mark a line 1 1/4" from the trailing edge of the wing, and another at 1 5/8"
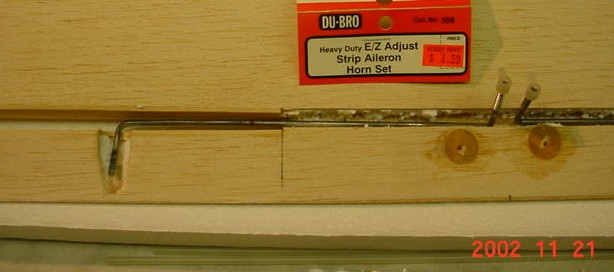
the entire length of the aileron. These two lines mark the area that you will cut out. Here is a picture to try and show how I make the cut. If you cut out the hinge gap with the directions above, you should have a 3/8" gap. DO NOT CUT THE EDGES OF THE AILERONS YET. By leaving these uncut until later, you will get a perfectly straight aileron. At this point, if you are using a foam sheeted wing, its time to cap the foam on the inside of the hinge line (both sides). I use 1/16" balsa, and glue with plain ole elmers, tape in place, and let dry overnight. After the glue is dry, remove the tape, and sand smooth. After the foam is capped, I mark and cut (on the bottom of the wing ((this is a high wing)) a groove for the torque rods to sit). You only want to go through one layer of balsa here, not all the through the other side. I use a smaller flathead screwdriver to push most of the foam out of the way. I like to use Dubro Heavy duty EZ adjust Strip Ailerons as shown in the picture. I think a lot of people started using this heavy-duty stuff because of how stiff most of the skinned hinges had become. I may go back to 4 / 40 because these hinges are not nearly as stiff as some of my early attempts. I typically have the prong of the torque rod enter the aileron about 3" in. Some people like to get it closer to the center of the surface, but 3" seems to work for me. With the heavier rod, I have been hesitant to extend it due to the heavy weight of the rod. Now I cut the spot into the aileron (at 3") where the prong of the torque rod will
sit. I like to cut this groove with a 1/4" sanding drum on my dremel tool. This
leaves an oversized hole, but I prefer that. It gives plenty of area for the glue to
hold the prong in place. It also gives you a tad of leeway when bending the torque
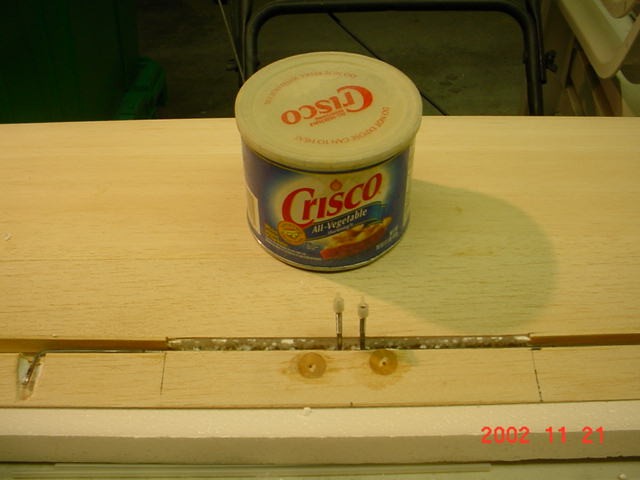
rod to size. It's time to share one of my dearest secrets. Over the years I have tried just about everything on torque rods, to stop epoxy from sticking to it. By far the best material I have found is Crisco Shortening. That white pasty stuff, we use to fry chicken in. Laugh all you want, but this stuff works good. I would also bet, that theres probably a can in the cupboard that hasn't been used for a while. I put a mark on the torque rod with a marker just as it enters the hinge gap. I apply
a generous amount of crisco to the torque rod up to the mark and set the torque
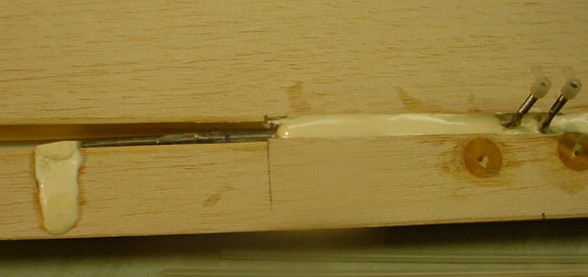
rod in place. Now that you have the torque rod greased up and in place its time to add the filler. I use Zpoxy finishing resin, and then mix a very healthy batch of microballoons into it. Consistency should be close to that of toothpaste. I carefully scoop, and press this stuff into the area over the prong, and into the groove above the torque rods. I apply a bit, let it settle, and add a little more. Try not to get to close to the edge
near the hinge gap, this stuff tends to run a bit as it settles, and you don't want a
bunch dripping into your hinge line of the aileron. I have made simple dams out of
scotch tape before, but if you get it thick enough, this is really not necessary. After
a while of playing with it, its time to sit back and let things dry. Once the resin dries, I usually wait overnight; I fill in any voids or gaps with lightweight spackle. Here is a closer look: Its time to start working on the top of the wing, and the hinge. The hinge I use is the Fiberglass .010 sheet I mentioned in the post above. Make
sure that you cut your hinge out of the sheet so that you are using the bias (45
degrees to the mesh) of the material on your hinge line. This wastes a bit more
material, but this stuff is only $14 for a 12" x 48" sheet, thats almost enough
material to do 10 quickies. The width of the hinge is 1 3/8", this gives 1/2" overlay
on both the aileron and the wing. I carefully draw the location and size of the hinge
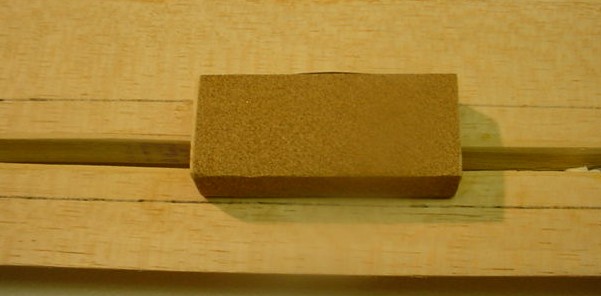
I plan to use. The problem I saw with using the fiberglass sheet, was how the heck do you recess it into the wing so that it sat flush. I attempted to use the G.P. Electric Razor plane on some scrap material, but it just didn't seem to do the trick. I couldn't keep a consistent depth or straight line. I decided to make a special sanding block, the exact width (1 3/8") of the size of the hinge. I then clamped a board to the TE of the aileron that lined up even with the rear edge of line I had marked on the aileron. I carefully ran my custom-sanding block along the guide back and forth. It took a
little time and was a little tricky on the edges, but I was able to get a pretty
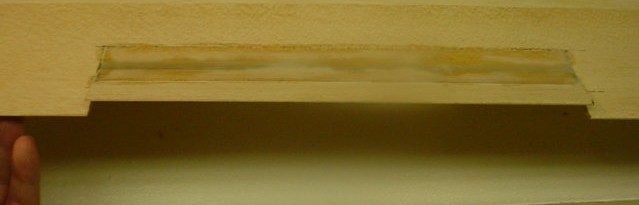
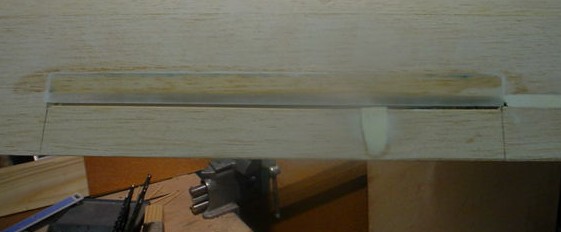
consistent .010 depth recess the exact size of the hinge I planned to use. Once I had the recess in place, it was easy to glue the fiberglass sheet hinge in place. The fiberglass sheet is pretty smooth stuff, so I was worried about glue sticking to it. I roughed up the bottom side of the hinge pretty well with 120-grit sandpaper. I then cleaned the hinge with isopropyl alcohol to remove the residue. Once I was satisfied with the fit of the hinge into the recess, I mixed up some 20 minute epoxy, and lightly brushed it in place in the recess. I stuck the hinge on the epoxy, and carefully taped the hinge in place making sure that it firmly was attached to the wood with a good glue seal. After I had both sides glued and taped, I flipped the wing upside down (top of the wing down) and placed it back into the foam shuck. I added quite a bit of weight to the bottom of the wing, and let it sit overnight to make sure the glue bonded properly. Here is a picture of one of the ailerons after I removed the tape the next day. At this point I sawed the edges of the aileron. I typically fiberglass my whole wing with 3/4 oz glass, prime and paint, so I really should have waited on sawing the edges, but they looked so good I had to check them out. After sawing through the edges with a fine bladed Zona saw, carefully break the torque rods loose. If you used Crisco, they will be loose almost instantly (to your relief). Here is a picture showing a little up aileron: And a little Down Elevator: I can honestly say, these are by far the smoothest, bind free, skinned hinges I have
ever seen. I also do not feel concerned that the fiberglass sheet will break. The last thing that needs to be done is to cover the gap on the bottom of the wing. I used the fiberglass sheet again, and another custom sanding block and jig to recess the sheet. I planned on a 1/2" overlay onto the wing, and left a good 1/8" gap between the rear of the sheet and the aileron. This gives you a little room to apply hinge tape after the wing is painted. I use Hinge tape that is available at Northeast Sailplane products. This stuff is
about a 1" wide and has adhesive on one half the width, and clear mylar on the
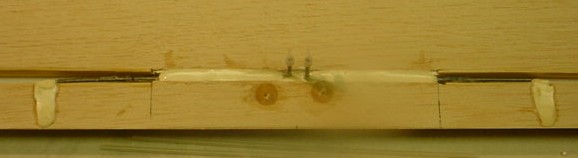
other half. After I get the wing painted, I will trim some of this tape so that the sticky part will attach to the aileron, and the clear mylar will fit under the lip that I just attached. That's really all there is to it. I wouldn't have gotten this far, if I hadn't just decided one day to give it a try. The first one, was a little tricky, but they have gotten much easier, and at this point are as easy, if not easier than doing the old torque rod, CA hinges routine. I would really like to thank Mike Del Ponte, for giving me direction a couple years ago, and Pat Galerneaut locally for sharing the fiberglass sheet with me. Here is a picture of the bottom gap sealed up. I used Thick CA for this rather than
epoxy. Either would work for the bottom, but I don't think I would trust CA on
the top. |
|||
 |